Tags are labels you attach to responses so you can filter, export and compare parts of your data. You might tag by venue, class, arm, instructor, wave or anything else that matters to your project.
Tags are the one mechanism for all of this. They can be applied before you print, while you collect, or long afterwards, and wherever they come from they end up in the same place: a column you can filter on, compare by and export.
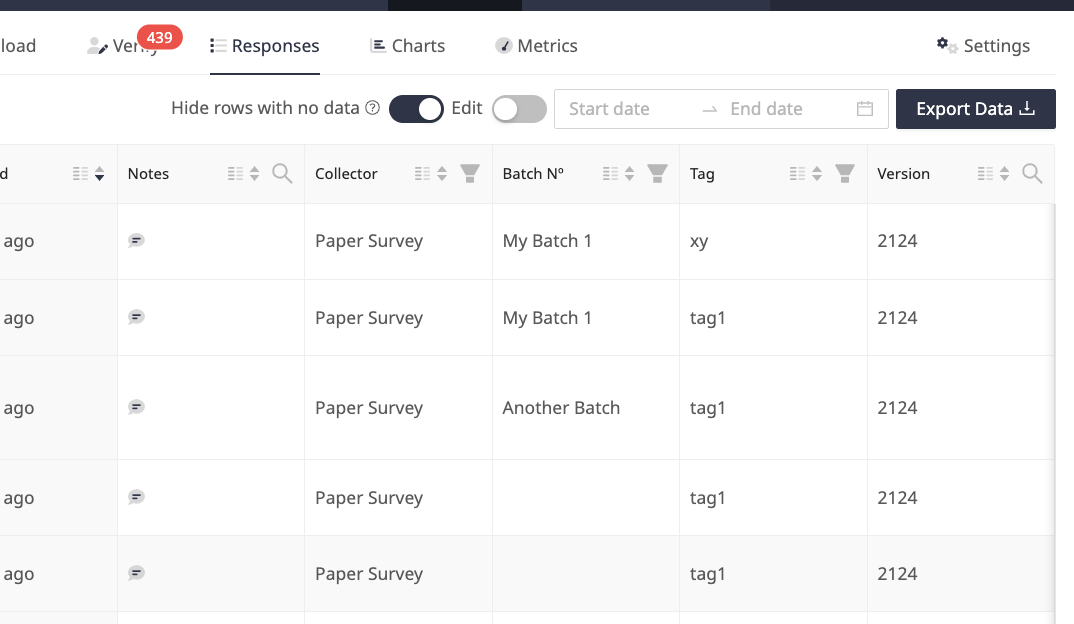
What tags let you do
- Group responses by site, arm, wave, source or time period
- Filter the Responses table, the Dashboard and your analysis views
- Compare results by a tag, the same way you compare by a question
- Export only the subset you need
- Add a data point that was never a question on the form
- Mark test data and special cases
Structured tags (KEY:VALUE)
Write a tag as Key:Value and PaperSurvey treats it as structured data. The part before the first colon is the key, the part after it is the value.
Venue:Main Hall gives you four things a plain tag does not:
- The key is highlighted inside the tag, so the value reads at a glance.
- Each key becomes its own column in your exports, filled with the value for every response that carries it.
- Filters group the values under their key, so you get a Venue list instead of a flat set of tags.
- The key can be used as a comparison dimension, so any question can be cross-tabulated against your venues.
There is nothing to switch on. Type the colon and the rest happens.
Examples
Any key that describes your data works:
Venue:Main Hall,Venue:Cafeteria,Venue:LibrarySchool:Lincoln High,School:Riverside ElementaryClass:5B,Class:6ALocation:Berlin,Location:VilniusCohort:2026Instructor:Dr. SmithEvent:Spring GalaShift:NightDepartment:RadiologySession:Morning,Session:Afternoon
Only the first colon splits the tag, so a value can contain colons of its own. Time:10:30 has the key "Time" and the value "10:30".
Tags without a colon, such as VIP, Urgent or Test data, stay plain tags and behave exactly as before. Web addresses like http://example.com are left alone too, so they are never mistaken for structured tags.
How they appear in exports
Suppose three responses are tagged like this:
| Response | Tags |
|---|---|
| 1 | Venue:Main Hall, School:Lincoln High, VIP |
| 2 | Venue:Cafeteria, School:Riverside Elementary |
| 3 | Cohort:2026 |
The export gains one column per key, next to the regular Tag column:
| Tag | Cohort | School | Venue |
|---|---|---|---|
| Venue:Main Hall, School:Lincoln High, VIP | Lincoln High | Main Hall | |
| Venue:Cafeteria, School:Riverside Elementary | Riverside Elementary | Cafeteria | |
| Cohort:2026 | 2026 |
A few details worth knowing:
- The regular Tag column is unchanged and still lists every tag, structured or not.
- A response without a given key gets an empty cell in that key's column.
- Keys match regardless of capitalization, so
venue:CafeteriaandVenue:Main Hallshare one Venue column. - If one response carries two tags with the same key, for example
Language:EnglishandLanguage:Spanish, the cell contains both values separated by commas. - The key columns appear in Excel, CSV, SPSS, SAS, Stata and R exports, in multi-survey exports where keys are combined across surveys, and in connected Google Sheets.
- Statistical formats get proper variable names, for example
tag_Venuein SAS and Stata andTAG_VENUEin SPSS, with the label "Tag: Venue".
Tagging after data collection
This works for every survey and every upload method.
When you upload
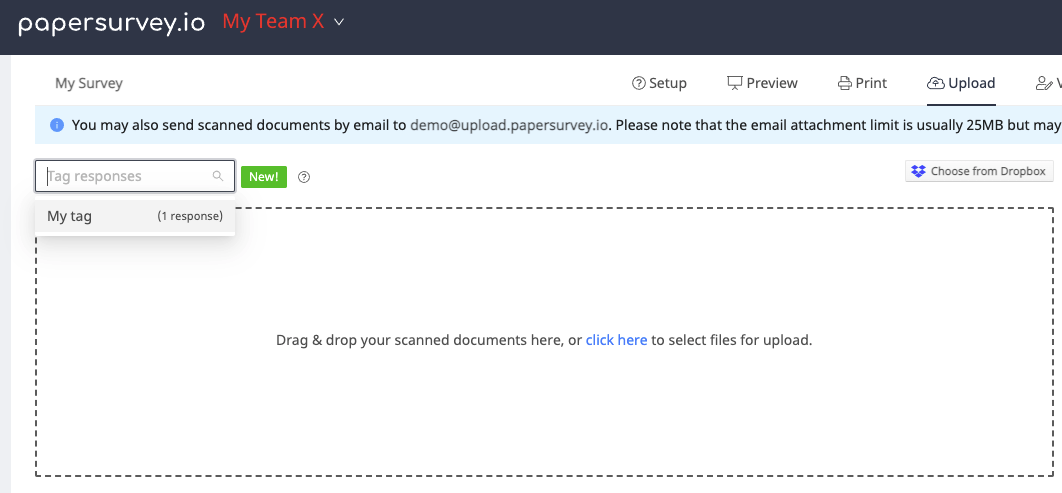
- Scan your completed surveys
- Click "Upload" in your survey dashboard
- Type one or more tags in the tag field, for example
Venue:Main Hall - Complete the upload
By email
Add +tag to your upload address, once for each tag:
- Base address:
demo@upload.papersurvey.io - One tag:
demo+classroom1@upload.papersurvey.io - Two tags:
demo+classroom1+morning@upload.papersurvey.io
Neither a colon nor a space is legal in an email address, so two characters stand in for them:
| Type this | To get |
|---|---|
= |
a colon |
__ (two underscores) |
a space |
So:
demo+Venue=MainHall@upload.papersurvey.iotags the scansVenue:MainHalldemo+Venue=Main__Hall@upload.papersurvey.iotags themVenue:Main Halldemo+Venue=Main__Hall+Wave=1@upload.papersurvey.iotags themVenue:Main HallandWave:1
A single underscore stays a single underscore, so a tag like Site_ID:A1 can still be sent as demo+Site_ID=A1@upload.papersurvey.io.
Every upload can also be tagged with the sender's address. If john.doe@example.com sends in scans, all of their responses are tagged From:john.doe@example.com, so every sender lands in one From group in the filters and one From column in exports. Plus addressing keeps working alongside it, so an address can carry both. Setting the key yourself with +From=Reception__Desk replaces the sender address, which helps when one mailbox forwards everybody's scans.
Web surveys
The best option is a tracked link. On the survey's share screen, open "Tagged Links" and create a link for each campaign, channel or group. Every response that arrives through it is tagged automatically, the respondent never sees the tag, and it cannot be removed. You get a short link plus a QR code, and structured tags such as Channel:Newsletter work here too.
You can also put the tag straight in the survey URL:
https://www.papersurvey.io/s/52k6rk?tag=spring2024That is quicker to set up, but the tag sits in the address bar where a respondent can delete it before submitting, so prefer a tracked link when the grouping matters.
API and integrations
Uploads sent to the API can carry their own tags: pass a tag parameter, either a single label or a list, exactly as you would type them in the app. Structured tags work here too.
When no tag is sent, the upload is labelled by where it came from: api, zapier, dropbox, email or web. Zapier sends whatever your Zap is configured to send, so set the tag there if you want something specific.
Updating tags on existing responses
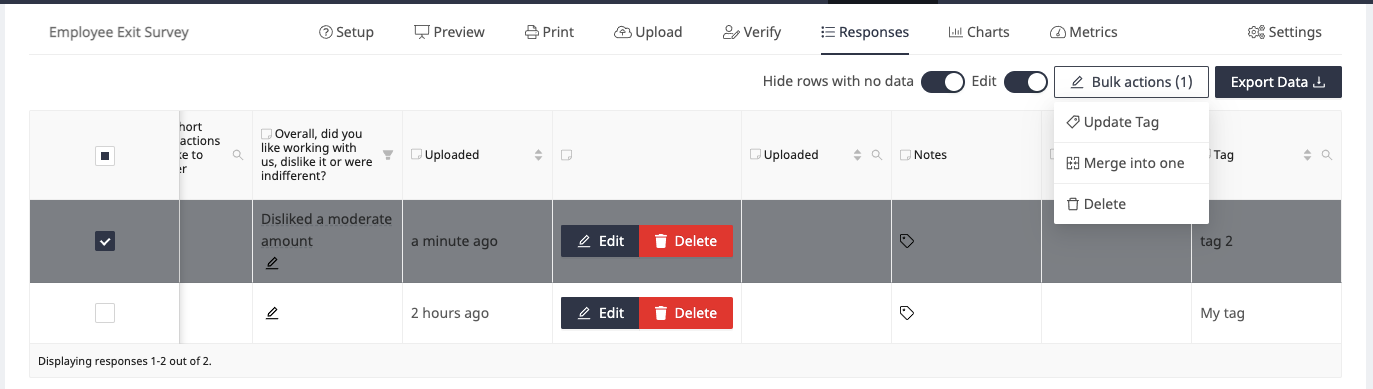
Nothing has to be decided up front. You can tag, retag or untag at any point.
A group of responses. On the Responses page, switch to Edit mode, tick the responses you want, then choose Bulk actions and Update Tag. Pick whether to replace the tags, add to them, or remove specific ones.
One response. Use the pencil on the response row.
Everything in one upload. On the Uploads page, click the pencil in the Tag column. The same three choices apply, and the modal lists every tag currently on that upload's responses with how many carry each, so you can see what you are about to change. Only the tags that upload gave the responses are affected: tags from the survey version or the print batch, and anything a reviewer added by hand, stay as they are.
Filtering by tag
Use the tag filter in the Responses view, the Dashboard or an analysis view. Structured tags are grouped by key, so with Venue:Main Hall, Venue:Cafeteria and School:Lincoln High in use you get a Venue group and a School group, each listing its values, alongside your regular tags.
The keys behave as separate questions about the same response:
- Picking two values of the same key widens the result. Venue: Main Hall or Cafeteria gives you both venues.
- Picking values of different keys narrows it. Venue: Main Hall together with Wave: 1 gives you only the Main Hall responses from wave 1.
Each key also offers two options of its own:
- Any Venue matches every response that carries a venue, whichever one.
- No Venue matches the responses that were never given one, which is how you find what still needs tagging.
A response can carry as many tags as you need, so School:Lincoln High and Class:5B sit together happily and end up in separate export columns.
Breaking results down by a tag
Because a key behaves like a question, you can compare by one.
On the Compare Responses page, pick Tag: Venue in the "Compare by" list and every question is cross-tabulated against your venues, with the same significance testing you get when comparing against a question. In an analysis view, a Cross-Tab block can do the same: set its column to a tag key and the chart splits by it.
That is the real payoff of writing tags as Key:Value. A plain tag can only be filtered on; a key can be compared.
Tagging before data collection
You can decide the tags in advance, so nobody has to remember anything when the scans come in. This is the most reliable way to work: the tag arrives with the response no matter who uploads it or how.
Tag a survey version
If you print more than one version of a form, tag the version.
- Go to the Print tab
- Click the settings icon on a version
- Enter its tags, for example
Arm:Treatment
Every response collected on that version carries them. This suits anything where the form itself is the grouping: a study arm, a site, a language, a school. Change the tags later and the responses already collected are updated too.
Tag a print batch
If the same form goes to several places, tag each printing.
- Open the Print tab and start generating copies
- Enter your tags, for example
Venue:Main HallandWave:1 - Generate the batch
Every response scanned from that batch is tagged. Prefill forms work the same way: their generate-copies screen has the same tag field. You can change a batch's tags later from the Prints page, and the responses already scanned are updated as well, so a correction is never stranded.
If you switch on Instructions when generating copies, the instructions front page lists the batch's tags together with any version tags, so whoever hands out the forms can see how the responses will be tagged.
Shared print links can carry tags as well. On the Share Print Page, click Share to create a link, or Edit next to an existing one, and enter its tags. Every batch someone generates through that link is tagged with them, without the person printing having to know about tags. Changing a link's tags applies to copies generated afterwards, so a link you reuse for the next wave does not rewrite the last one. To correct responses from copies already generated, filter the Responses page by the old tag, then use Bulk actions and Update Tag.
Tag a scanner code
If your team scans with phones, tag the scanner code in Settings. Everything scanned with that code is tagged, which is a neat way to tell field workers or sites apart without training anyone to type a tag.
They all add up
Tags from different stages combine rather than compete. A sheet printed on the Arm:Treatment version, in a batch tagged Venue:Main Hall, emailed to demo+Wave=2@upload.papersurvey.io, arrives carrying all three. Each becomes its own export column.
Practical patterns
- Multi-site studies: tag each site's print batch with
Location:Berlin,Location:MunichorLocation:Hamburg, and the export gives you a ready-made Location column for cross-site comparison. - A/B tests: tag each version with
Arm:TreatmentandArm:Control, then compare any question byTag: Arm. - School assessments: combine
School:Lincoln HighandClass:5Bon the same response and the export contains separate School and Class columns. - Training sessions:
Instructor:Dr. SmithplusSession:Morninglets you pivot results by instructor and by session without touching the questionnaire. - Longitudinal waves: tag each printing with
Wave:BaselineorWave:Follow-upto get a Wave column you can use directly in SPSS or R.
Other ways to tell responses apart
Tags are the recommended approach for all of the above, because they are the only one that produces a column you can filter, compare and export. A few older options still exist and are worth knowing about if you want the grouping printed on the page itself: batch numbers label a group of forms printed together, identifier prefixes put your own text in front of each copy's unique number, and prefill forms embed respondent details directly into the printed form. They mark the paper rather than the data, so reach for tags first and use these when you genuinely need something visible on the sheet.